Latest Updates

Decor steals!

Hello friends and happy Thanksgiving/Black Friday! I hope your holiday was wonderful! Mine was just lovely, I have much to be thankful for. Today I’m thankful I’m not going out in the crowds and shopping and instead staying home and decorating and maybe doing some shopping from the comfort of my couch. :)

Are you with me? :) If so my friends at Decor Steals are back and I just realized today is their four year anniversary and we’ve been working together for all of those four years! Sniff. I remember them when they were just a babe…

decor-steals-LOGO.jpg[7]

If you aren’t familiar with them, Decor Steals is a deal a day site – you can find unique decor items you won’t find anywhere else…and you’ll find them for a great price. Let’s jump in to see a few of their latest/upcoming goodies, shall we?

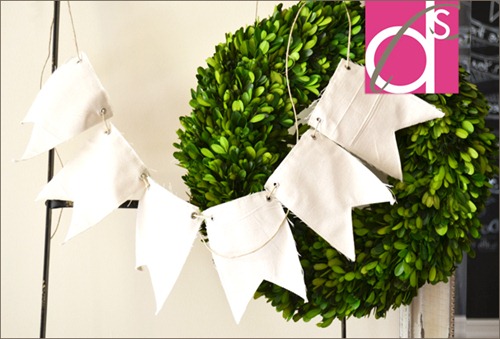
This cute bunting would be pretty as is but wow, think of all the possibilities:

feedsack bunting

It would be lovely with some glittery letters on it, draped across your Christmas mantel!

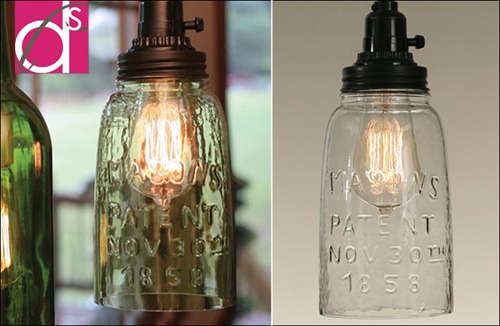
I don’t think the mason jar trend is going anywhere soon, and I love these lights:

mason jar pendant lights

They’d be especially cute in a kitchen or a bathroom. They are a great mix of vintage and industrial!

And these are actually solar lights, how cool is that?:

solar mason jar lights

I love the Decor Steals boxwood wreaths – you can see how I use mine year-round here:

preserved boxwood wreaths

I would fill my house with them this time of year if I could! They are so classic and pretty!

These ladders are so functional – I love to see them used in a bedroom for extra blankets:

 vintage wooden ladder

But how about in a bathroom for towels, or for Christmas – hang ornaments from them, or Christmas cards?

Today’s deal is another versatile one – their reproduction feedsack fabric is always a hot seller and I’m sure today will be no different!:

Feedsack sewing fabric It comes in five different colors and I think it would be SO lovely as a Christmas skirt!

The best news today is that Decor Steals is giving away a $50 credit to two lucky readers. They are also throwing in a surprise box to a reader as well!

Here’s how to enter to win one of two $50 credits and the free goodies to Decor Steals:

1. Leave a comment here. What did you eat yesterday? We made prime rib instead of turkey – it’s become a tradition for us. :) SO good. 

2. Visit Decor Steals here and check out their pick steals page. Which item do you want to see offered in the future? Come back here to let us know in a comment.

3. Visit their Facebook page and “like” it here. Let us know you did in another comment. (Or let us know if you already do!)

4. Subscribe to their email list here (you’ll get email notices about the new deals) and if you do (or are already on the list), leave one more comment here.

* You can enter one, two, three or four times – it’s up to you! All options are not mandatory to win.

* Remember if you comment anonymously or you have a private blog, please include your email address in each entry, and spell it out with “at” and “dot” to avoid any spammy emails coming your way.

This giveaway is open to the contiguous US only. It will close this Monday, December 2 at 9 a.m. EST.

Have a wonderful weekend!
A Skåne sitting room beautifully decorated for Christmas

Since many of us will be celebrating the first weekend of advent over a glass of steaming glögg this weekend it's time for a little more Christmas inspiration. These lovely pictures are from the sitting room of the talented and inspiring Swedish blogger Anna-Malin of Helt Enkelt blog from here in Skåne. I love the way she's styled her sitting room for Chrsitmas it looks so pretty and cosy don't you think?


Anna-Malin, Helt Enkelt with kind permission

I love the mini Christmas trees that are trending this year. I've started to dot a few Christmas decorations around our home but we won't head out to the forest to chop down a tree for a few weeks yet. When will you start decorating (if you celebrate Christmas that is :)?

In case you're looking for more beautiful Scandinavian Christmas decorating ideas check out this white home, this Norwegian home and this Swedish home. Oj oj oj so lovely and Christmassy!

PS if you're in need of a little present inspiration or looking for something new for your home, check out my latest guest edit (click on the My Scandinavian Home banner). So many great things! And if you love wrapping you'll love the personalised gift wrap you can find here, I'm on it!

I hope you have a lovely weekend and Happy Thanksgiving to those of you on the other side of the pond!


A Swedish home with black floors and a mid-century touch

I arrived in London yesterday for an over night stay. It's always a treat to come home not least because my Mum is the best cook in the world! She also showed me something she bought at an antique auction yesterday and it made me think I should spend more time hunting for vintage / mid-century / antique items. there are so many beautiful items to be found! Today's home currently for sale through Fantastic Frank blends Scandinavian mid century furniture with modern touches and black floors. Perhaps dark floors are a great alternative to the latest trend in Scandinavia dark walls. I love the contrast but the apartment still appears lovely and bright. What do you think?


Fantastic Frank

Are you more of a light or dark wood floor person? or perhaps you have gone for carpets?

I spy: the SNOW chest of drawers, Svenskt Tenn elephant print on the chairs, and a lovely grey sheepskin rug. I find Lauritz a great source for Scandinavian mid-century furniture. I recently received a Frame 20 as a gift and it looks perfect on my mid-century coffee table - just a tip if you're looking to decorate your finds!

For a little inspiration on mid-century inspired homes check out these here and here. And other beautiful homes with dark floors here and here. I think I'm sold?

Have a lovely day and see you tomorrow for a Christmas inspired post!

DIY work bench, YES!

Hey there everyone! Are you ready for Thanksgiving? I’m excited to sleep in, stay in my pajama pants all day and eat with family. :) I hope yours is wonderful!

So remember last week when I showed you the massive clean out in the garage? I’m SO happy with it. There was one last project I wanted to complete in there and it was actually fairly quick and easy AND inexpensive. The trifecta!

This is the area I was planning on addressing:

I’ve had my saw on that storage cabinet for years now and it worked OK but not great. I wanted to have a lot more room to spread out. My dream has always been to have a work bench in the garage and that dream was much easier to realize than I thought. :)

I put a plan together (in my head) and gathered my supplies at True Value. Originally I thought it would be a lot more elaborate than it ended up being. I am quite sure you could do this, even if you’ve never built anything! And if you’ve never built anything I don’t know if you need a work bench, but whatever. Let’s pretend.

I got two 1 by 4’s and one 4 by 4 – all eight feet long. (I already had most of another 4 by 4 leftover from another project too.) I measured out how long I wanted the bench to be and it turned out to be right at eight feet, which was a bonus because I didn’t have to have to make nearly as many cuts.

The first step was to figure out how high I wanted the table to be – I knew I wanted it taller than the storage containers because I wanted to keep them underneath. Then I attached the board (making sure it was level) to the studs along the wall with three inch screws:

building a work bench

Next I held the 4 by 4 post up to that to see how tall I wanted them to be. I marked it at the top of the 1 by 4 on the wall, because I wanted it the same height, since my plywood would sit on both the board along the wall and the 4 by 4’s in front. Does that make sense? It will in a minute. ;)

I cut three posts down to use as supports along the front, then placed the plywood (I used a 4 by 8 piece cut right down the middle, so two feet wide) on them and started screwing them together:

I did make sure the posts were level before securing them to the top. I put four screws in through the top of the plywood into each of the posts. I used drywall screws for this part – I use those for a lot of woodworking projects since they are so easy to get into the wood.

I secured all three posts and then did the same at the back of the plywood, up against the wall:

You could easily do that part first and then the posts, it doesn't matter what order you do it in.

Here’s where I opened my mouth, stuck in my foot and said, “Wow, this is going so well!”

WHY? Do I EVER learn?

Cause then I messed up.

I used the second 1 by 4 as an “apron” across the front – I just thought it finished it off nicely and looked a little better. Then we (my sis actually) realized the storage containers wouldn’t fit underneath with it on there. So we took that off, put them under there, then started putting it back on, but realized the container doors to the right wouldn’t open with the wood along the front:

work bench in garage

So instead I used a scrap 1 by 2 I had – losing those two inches made it so I could open everything just fine. (As you can see above.)

I secured that to the posts with drywall screws too:

building a work bench

You can see in that photo how simple this whole thing was – it’s just a brace along the back wall with plywood on top and 4 by 4’s as supports in the front.

Super simple design:

DIY workbench garage

I didn’t secure the posts into the cement floor – there’s no need to. The weight of the wood keeps them where they are.

Since the table is so close to the door I knocked down the edges and corners just a bit for safety:

DIY workbench

Can I just say how much I love this?? I LOVE IT!! Why did it take me so long to do this?

I finally have space to spread out – there’s plenty of room for me to work and in my old workshop area it was impossible:

Easy DIY workbench

Plenty of room for a table saw too. ;) I got one a few weeks ago but it was messed up so I took it back. I’m going to try again soon.

Even with our slight mess up this project was much easier and quicker than I thought it would be. And that NEVER happens. The total cost was less than $50 – the main expense was the piece of plywood that was $25. (The thickness is more than half an inch for extra strength.)

It’s silly but it makes me feel like a real DIYer:

easy DIY workbench

And it looks so much cleaner and nice compared to how this spot used to look! Love.

The garage is like night and day from before – I can’t believe how much better it looks and functions now. It’s stayed clean for three weeks now – that’s how I know it finally works for us! Isn’t that a great feeling?


I was one of the bloggers selected by True Value to work on the DIY Squad. I have been compensated for my time commitment to the program as well as writing about my experience. I have also been compensated for the materials needed for my DIY project. However, my opinions are entirely my own I would have done this project anyway and I have not been paid to publish positive comments.

For more project ideas visit True Value here or their Facebook page here.

Children's room from Bang Bang Copenhagen / Ollie & Seb's Haus

My older little girl is keen to update her bedroom and never one to turn down a decorating opportunity I've been pouring over children's room inspiration on Pinterest. One of the coolest children's rooms I've seen is from the home of Deborah of Ollie & Seb's Haus. The fab room has been styled for an A/W 2013 cushion shoot for quirky children's clothing and accessory brand Bang Bang Copenhagen.  Last week I was admiring the sofa in the kitchen - today I'm dreaming of my children having a big enough bedroom to fit a sofa like this one - so comfy!


Ollie & Seb's Haus, Bang Bang Copenhagen. with kind permission. 

I spy the white rabbit lamp (I also love this cute rabbit one from Made in Design and get 10% discount with code SCANDI-HOME!), apple papple print, and Brio stove (my little girls have this and I've had many a fake meal served to me from this oven, they love it!), Tam Tam stool (10% off with code SCANDI-HOME) and Bang Bang Copenhagen cushions

You can see more pictures of Deborah's little boy's wonderful room here as well as get some more tips on where to buy some of the items you see. 

Other children's rooms I love: this, this and this one. So fab!

Since it's the first advent this weekend I'm planning a Christmas post on Friday with lots of Christmas decorating ideas so if you're looking for a little inspiration pop back Friday with a cup of coffee. And of course there'll be tomorrow's usual Scandinavian home tour....

Have a lovely Wednesday!

The serene home of a Swedish fashion blogger

Hello! I can't believe how popular yesterday's home was, I really enjoyed reading all your comments both here and on Facebook (where it got over 245 likes!), it was indeed a beautiful apartment and I too could move in tomorrow. To continue the theme of homes for sale in Sweden I was extremely excited to come across the Stockholm home of Swedish fashion blogger Elin Kling which is currently for sale through Per Jansson. It's a picture of calm. I am particularly loving the bedroom - I'm sure it's impossible to have a bad nights sleep there, what do you think?


Per Jansson
Such beautiful images!

On Sunday we had a Facebook discussion on whether to go for less or more based on this post. Elin's home is definitely 'less' and the beauty of that is that it feels incredibly serene. Are you a less or more person?

Thank you so much to Sofia for today's tip. Have a lovely day!

Chevron, take two

Hey everybody! Happy Thanksgiving week! I won’t be posting much this week, and today’s post is short and sweet. I’m taking most of the week off and hope you’ll get plenty of family and rest time in too!

So here it is – my second attempt at chevron. If you remember I tried it a few months ago with my chevron Frogtape:

WELL. Funny story. When I was cleaning out the garage a couple weeks ago I realized I used the WRONG chevron tape. I work with Frogtape and they sent me their new shape tape before it even came out in the stores. This one must have been an early prototype that they didn’t use.

I grabbed this one off the shelf and didn’t even realize it was different from the others. The actual chevron Frogtape is actually much more chevron-y and less Charlie Brown-y.

I laughed out loud when I realized what I had done. Leave it to me. So last week I decided to do another little redo to that trash can.

I spray primed it and then spray painted it white…again. :) Then I played around with the tape to figure out the design I wanted. I was originally planning a thin line of chevron around the top and bottom but decided on a slightly different design instead:

chevron shape tape

I just offset the second line a bit to make it not exactly chevron.

I rubbed some gold rub n buff in between the tape and that was it!:

chevron painters tape

I decided simpler was better. :) Much better. This I love!

Their shape tape comes in three different designs – chevron, scallop and wave. (I showed you how I used the scallop design here.) As you can see you don’t have to use them as they come -- play around with them a bit to make your own look!

Want to try them out yourself? (You can see the designs here.) Leave a comment here this week and let me know which one you’d like to try! We’ll give away three of each design. I’ll announce the winner next week!

P.S. My friend Marty at A Stroll Thru Life has a lovely blog and highlighted me last week – go here to check it out!

A beautiful, classic Swedish apartment

Hello, how was your weekend? It's getting so cold here now BRRRRR and my hibernation instinct is starting to set in. This makes a cosy home even more important don't you think?! I thought I'd start the week with this very classic and beautiful Swedish apartment. Light wood floors, white walls, light coloured furniture, a white and light grey colour teme and there's that firepace (kakelugn)  in the bedroom again (imagine reading the papers in bed on a Sunday next to a roaring fire? Love that!). I could live here, could you?


Alvhem
I spy the Eames DSR and Thonet 214 chairs (15% off with code MYSCAN). The Cross blanket. Visit BLACK SHEEP (WHITE LIGHT) for beautiful sheepskin rugs. The armchair and blanket are both IKEA (I think). For beautiful prints try Silke BondeElina Gardin or OHMYHOME.

You can see more pictures of this beautiful home over at Alvhem. For more inspiration on white and light grey Swedish homes check out this and this - oj oj oj så fint! and actually, even my bedroom!

PS If you're looking to get organised in the new year you have just three days left to sign up for the Nest newsletter and be automatically entered into the prize draw to win a Uten.Silo (sign up before 28th November). Like!

Have a lovely Monday!